I like to brew wine; It's only a hobby but I'm obsessed!
This is the place to be if you want to see what another brewer is up to or want some encouragement to start or diversify. I've posted heaps of recipes (clicky) and 2 wine-making vids (here for wine made from cartons of juice blog / youtube, and here for Blackberry wine on the pulp blog / youtube).
If you're new here then do explore, take this link for tips about where to find what you're interested in.


Wednesday, 31 December 2014

Blackberry & Elderberry, Recipe

Because the garden doesn't produce an abundance of big juicy sweet blackberries, but nature makes an abundance of smaller more sour blackberries, i like to have more than one recipe. This one is a result of an evolving process. I've been improving my blackberry wines every year for over 20 years. And this is part of that evolutionary process.

You're going to get a different wine when you use wild, foraged, blackberries than when you use something cultivated. even if that cultivation is as simple as pruning a wild bush (which is what i do). So you'll need to tweak the recipe to make something you enjoy.

I enjoy a big red wine, lots of body, acidity, astringency and alcohol, in balance. And balance is the key. Miss one part of it and your wine will be unremarkable, not great. Miss two and it'll be a flop. So aim for all 3. elderberries are great for adding balance. Go cautiously tho, the more you add the longer you'll have to wait for the wine to age. Pure elderberry wine takes years to age, the more the better. 5 years is what you should be looking at. Reduce the ratio to something like 33% and the time comes way down, around a year being enough. At 15% 6 months may do it.

For this recipe i've taken a punt on laying it down for a year minimum, and maybe more like 2. I got this brew going in September. It should come in around 13% ABV, so it needs time at that strength, and its so worth it. You may want to pop it open after 6 months, and you'll enjoy it cos you made it. but if you wait then you'll be making fine wine. It's so worth it. Need some replacement for disciple with that? Make lots of quickie wines. They are delicious, cheap, easy, quick. check out my recipe list page and look for those with "quickie" or "Q" in the heading.

But now, onwards with a recipe and method for making blackberry wine with some elderberries.

Recipe 2 Gallons

3.00 Kg Blackberries
1.35 Kg Elderberries
2.2 Kg Sugar
4 TSpoon Pectolase
1 TSpoon Citric Acid
1 TSpoon Tartaric Acid
2 TSpoon Yeast Nutrient (Tronozymol)
Yeast (lees from last brew, GV11)

Original Gravity 1092

I didn't take a picture of the ingredients, so here's a close-up picture of the material of a coat that was bought for me this year. I used this image in a DVD wallet that i made this year. Big up to Rob Walker for that idea, and big up to Mrs Critter Wines for buying me the coat.

Method

I'm assuming that you're familiar with my blog, so i can give a short-hand version of the method. However, if you're not then don't despair, got to my index page (click) and find an earlier version of the wine, the method will be laid out there, more fully.

Mash your berries and put into the fermenting bucket. This is on the lees of the previous wine. So you will have decanted or  siphoned that wine from its sediment. The sediment contains live and healthy yeast tho. So you can use it again. But be cautious, it is a living colony of biological critters. If you heat it up too much it'll get wiped out!

Dissolve sugar in hot boiled water and add to fermenting bucket. when it's cooled enough.
Dissolve pectolase and acids in warm water and add to fermenting bucket..
(for a more natural version use lemon juice at rate of juice of one lemon for a 1 teaspoon of citric acid)
Add yeast nutrient and stir. You'll have  healthy colony of yeast there already. Just measure the
gravity after stirring well and cover it up.

After a few days (4-7 depending on season - cos using frozen berries works just fine) it will be a good time to decant into secondary fermentation under airlocks. After another week or so rack into demi-johns. At this stage you can add things like campden tablets, potassium sorbate and finings. Or you can wait for time to pass, the fermentation to run it's course and stop. The wine to clear and patience to pay dividends. Then bottle it when you want to drink it, or need the demi-johns. Then lay it down of it's bottled with corks.

Discussion.

I've used a high proportion of elderberries to blackberries this year. I'm aiming for a big wine and prepared to wait for it. i'm thinking 1-2 years and happy with it cos i made a few gallons of blackberry earlier this year, form last year's frozen berries.

Big Garden Blackberry Wine, recipe

Again, it's been a long time since i did a brewing blog entry. But hey it's not easy finding the time and while i appreciate the donations (i really do, and thank you muchly to those who donate) they are few and far between, so my focus needs to go on efforts towards putting bread on the table .. cos wine alone is not enough.

But now i've got time to update the blog, just before the year is out. So here's a recipe from August. Using blackberries that i lovingly tend in my garden. Making sure that each cane has fewer berries to nurture than would have happened if nature were left to her own devices. And this means the berries are bigger, sweeter and juicier. Onwards then, with the recipe and method ...

Recipe, 2 Gallons

3.6 Kg Blackberries
2 Kg Sugar
3 Litres Red Grape Juice (Asda, pure pressed)
2 Campden Tablets (crushed)
3 TSpoon Pectolase
2 TSpoon Citric Acid
2 TSpoon Yeast Nutrient (tronozymol)
Yeast (GV11).

Original Gravity 1100

Method.

You've probably followed my blog for some time so i'll do the condensed method version.
Mash your berries and tip into a fermenting bucket.
Dissolve sugar in boiled hot water (2 litres is enough) and add to fermenting bucket.
Dissolve campden tablets, pectolase and citric acid in warm water add to fermenting bucket.
Add grape juice to fermenting bucket. Rinse bottles and add rinsings.
Cover and leave overnight.

Next day make up to 2 gallons with water or sugar solution to achieve your desired original gravity if 1100 isn't strong enough (perish the thought!). Then stir sloshily (i use a whisk) and add yeast nutrient and yeast then cover. Stir sloshily daily for a few days.

After a few days decant to demi-johns for secondary fermentation under airlock. Then when fermentation has quietened down or stopped rack, leaving sediment behind, into demi-johns. Then be patient and wait. If you want you can wait for the fermentation to stop and then add campden tablets and potassium sorbate and finings. But if you want something close to chemical free then check the gravity when it's stopped fermenting (gravity doesn't change week to week). If it's in the range of 990-998 ish then it'll be done and you can probably get away without further additions.

Bottle your wine when you need the demijohns. not before. Your wine will mature better in bulk than in bottles. If you use a cork then leave the bottles upright for 24-48 hours and then lay them down. If using screw caps then standing upright is good.

Discussion.

Blackberry wine is delicious but without the addition of some grape juice it is not to everyone's tastes. Grape juice will make it into something that everyone will recognise as wine, but will be surprised by, cos it tastes just a little different.

Also, by adding grape juice, you add additional body and nutrients, which means you can up the alcohol content. so if like your red wines big and balanced, like an Aussie Shiraz (as i do), then this is the way to go. This recipe will make a wine around 14% + ABV. So when i said "perish the thought of adding more sugar" i meant it!

UPDATE and sign off on this wine


I opened the last bottle of this yesterday, March 2021. It's 6 & 1/2 years old. Wow. Time did some magic with this wine. It was already a decent wine to enjoy from about a year after pitching the yeast. However if you copied this recipe and laid some down then you're in for a treat.

First off let's say that time improving this wine is not a surprise. It's strong at 14.1%. There is also plenty to it, not only the blackberries, but the grape juice too. Time will help everything come together with seamless edges.

First impressions. There is a small amount of fine sediment in the bottle. It's been lying down, to keep the cork moist, so the sediment is where you would expect it to be rather than in the bottom of the bottle. The sediment is very stable. Even 2 days after opening it's stuck tight on the bottle and hasn't sneaked into my glass.  The cork was deeply stained about 15% the way up. 2 Days after opening the cork is still very "deformed" into the shape of the bottle neck. 

Next observations. The wine is a beautiful deep purple and clear. Amazingly there is still a very slight frizz to the wine. It is very slight and you could easily miss it. So whether you like a frizz or loath a frizz you'll only notice if you're looking for it.

It's a big, fruity, dry and rounded red. If, like me, you make 10's of bottles every year then laying some down is worth it. The addition of grape juice seems to have been vital learning. In future if all i have is blackberries i'll defo add grape juice. Not only for drinking while young (1-2 years old) but also for laying down.

Saturday, 6 September 2014

Many thanks Aleksandr


It's been a while since i updated my blog, what can i say, i got very busy, i apologise. But today i got a notification that someone, Aleksandr, had made a donation. Thanks heaps Aleksandr, i appreciate it, you motivated me to update my blog. There's still 2 more recipes/methods to come (one blackberry, the other blackberry and elderberry) but i have just added this year's elderflower wine recipes and methods. A total of 20 gallons, or 120 bottles. So read on.

Recipes, 4 of them! This Year's Elderflower Wines

So, I'm sorry, this is meant to be a blog, kinda like a diary, and it's months since i updated it. But i'm still here, still brewing, just been busy. Anyway, you're here for wine talk, not for practicing forgiveness ... so i'll crack on.

Summer time, seriously one of my strongest associations with summer is elderflowers. I love their smell and i love making wine with these delicious gifts of mother nature. As regular readers, or brewers who only come here for elderflower wine tips, you'll know that i made 20 gallons (120 bottles) last year. And this year was the same.

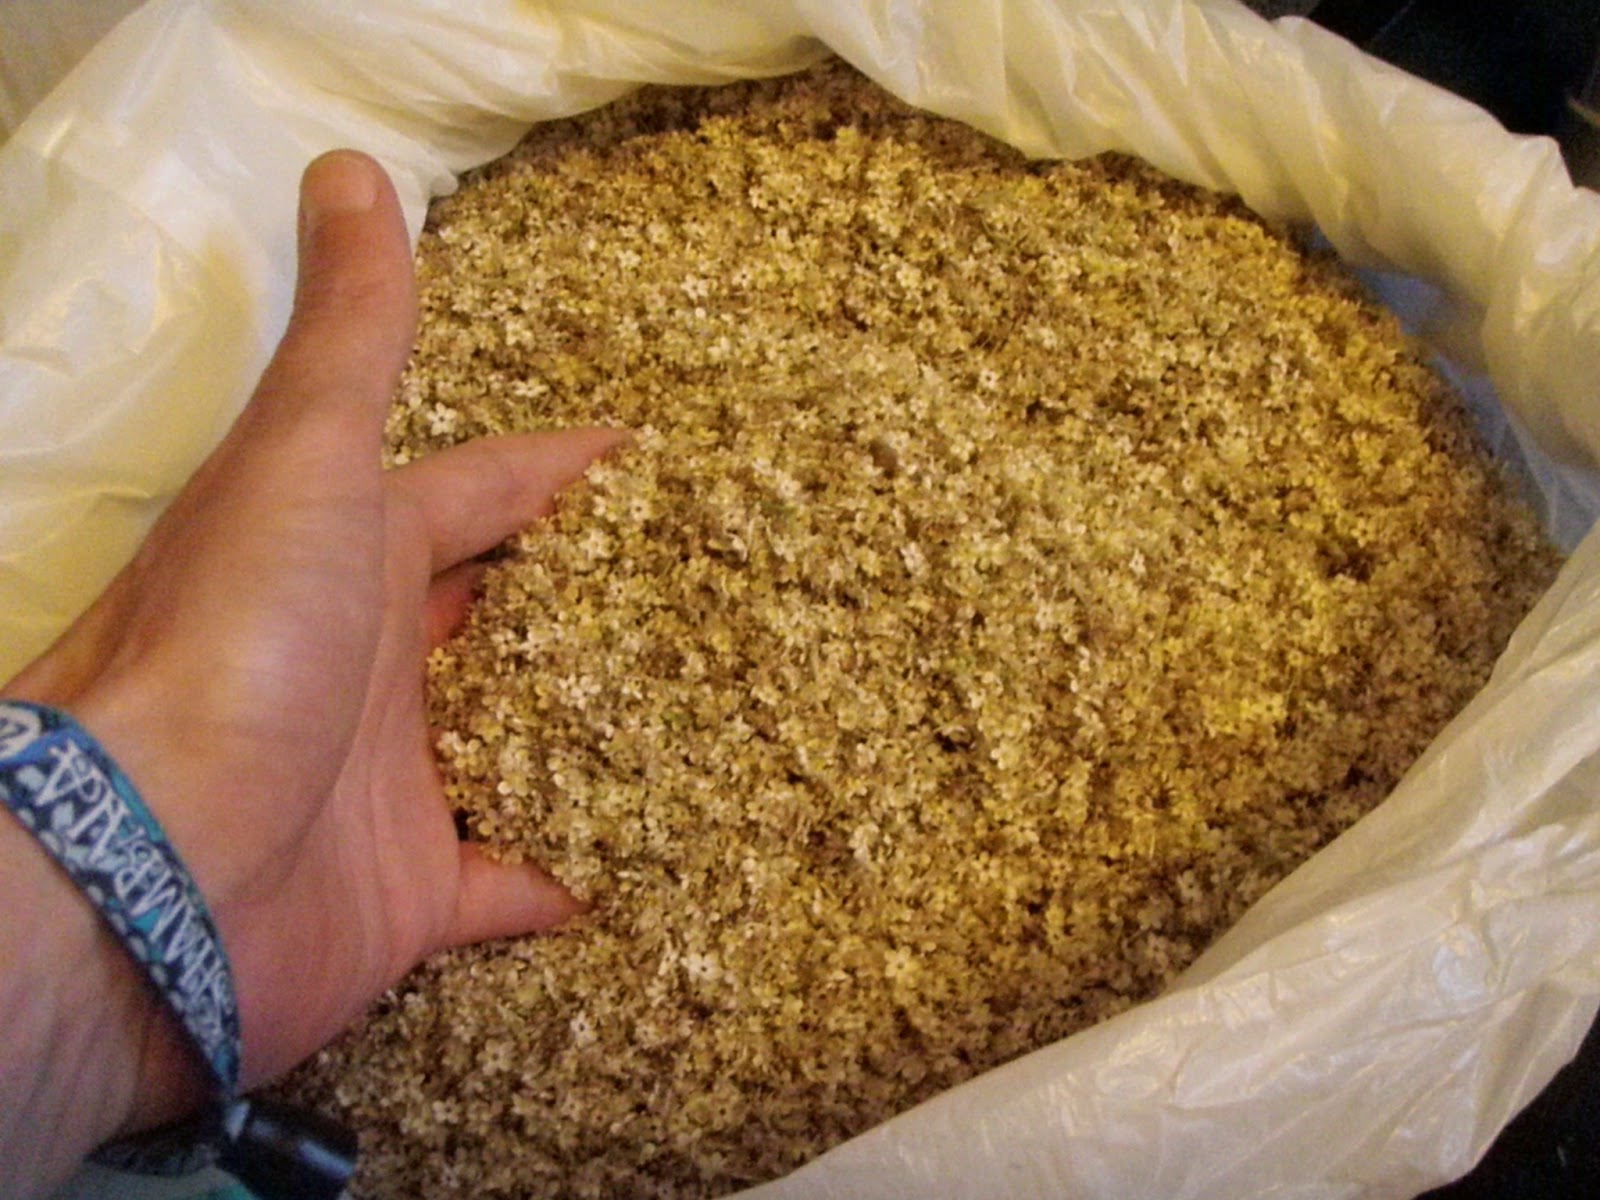
This year's haul of elderflowers

My plan was to use the quickie wine base, but only use grape juice (no apple juice). However there was a grape juice shortage in the UK. I thought it may have been a local issue, but a friend on the other side of the country had the same problem. The only supermarket stocking it in June was Asda. Not that i'm plugging Asda, my aim is to point you in their direction if the same problem occurs next year. So, as it turned out, i made 10 gallons with only grape juice, and 10 gallons with both apple juice and grape juice. Same as last year then.

Here's this years recipes.

Recipe 1. Elderflower wine. 5 gallons.

5 Litres White Grape Juice. Asda, pressed, long life
5 Litres Red Grape Juice. Asda, pressed, chilled
5 Teaspoon Citric Acid
4 Teaspoon Yeast Nutrient (Tronozymol)
2.9 Kg Sugar
GV5 Yeast
Elderflowers, 3 litres.

OG 1071


Method

Same old same old, you've seen it many times before.
Collect flowers on a dry sunny day. Drop them into a plastic bag and tie it. Leave overnight. Next day shake the bag for 5-10 minutes. Flowers and pollen will drop off the sprays. If your brew isn;t ready for them then put the flowers/pollen in the freezer.

Dissolve sugar in hot water. Pour into fermenting bucket. Add fruit juices. Dissolve citric acid in a little water and add to bucket. Add yeast nutrient and water to make the volume upto 5 gallons. Measure gravity and record it. Stir vigorously or use a whisk. The aim is to get air dissolved in the must cos the yeast needs it at the budding (reproducing) stage. Then add the yeast.

Stir daily, briefly. After about 5-10 days decant into a fermenting barrel under airlock. Add the elderflowers (in muslin bags). Leave it be for a week or so. Adding flowers late is good for 2 reasons.

  • The early days of fermentation are very vigorous and it blows-off lots of the delicate elderflower flavours ... straight out of the airlock.
  • The secondary fermentation stage is much gentler, and there is alcohol present. So you get better flavour extraction. And that means you need way less elderflowers, which means less time spent collecting and processing them.

After another week or so, when the fermentation has slowed right down, remove the flowers and rack to demi-johns. Then leave it be and in 4-6 weeks it'll be bright, crisp, light, clear and ready to drink. Something like 10-11%ABV. Don't be tempted to make it stronger by adding more sugar, it'll take longer to age and won't be any better quality.

Recipe 2. Elderflower wine. 5 gallons.


The ingredients and quantities are exactly the same as the above recipe. With one exception the method is the same too. The exception is that when i decanted the wine (in recipe 1) into the fermenting barrel is used it's lees to start recipe 2. The lees is essentially just a ready made healthy yeast colony that is raring to get going!

Be sure that you don't add hot liquids to the lees, else it'll probably kill the yeast. And save yourself something like £1.00 in the process! Hey count the pennies and the £££'s take care of themselves.

Recipe 3. Elderflower wine. 5 gallons.

As for recipe 2, i.e. on the lees, but a few little changes, nothing to be confused by tho.
Original Gravity (OG) 1065

Due to not being able to find enough grape juice i used a mixture (50:50) of white grape juice (5 litres) and apple juice (5 litres). The apple juices were 3 litres of Rio D'oro and 2 litres of Fruit Hit. There's nothing special about these brands (well the latter is organic and fairtrade), any apple juice will do as long as it has no artificial additives. Artificial sweeteners will not ferment so if you a juice containing these you'll end up with disgusting sweet wine. Preservatives will probably prevent your wine from fermenting. Whether the juice is pure pressed or from concentrate is only of concern if you're of the opinion that fluoridated water is bad for you. Cos diluted concentrated juices will probably use  tap water, i.e. fluoridated. But pure juice won't.

As a result of using apple juice you'll probably want to make another addition. Pectic enzyme (pectolase). Apples contain pectin, and this will make it most unlikely that you'll get a clear wine without some intervention. Pectin hazes are not easy to get rid of. Having said that there will be nothing wrong with the wine anyway, it's just that clear wine is easier on the eye. My pectolase was out of date, so i doubled the usual quantity i use. i used 10 teaspoons of it.

Also as a result of using apple juice i needed to add more sugar. This is because apple juice does not contain as much sugar as grape juice. i used 3.2 kg of sugar.

And finally i used 4 teaspoons of citric acid and 1 teaspoon of tartaric acid. i reckon the apple juice adds a little different flavour compared to grape juice alone. and as citric acid tastes like lemon juice i dropped some and added the clean tasting tartaric instead. It's the dominant acid in grape juice.

Recipe 4. Elderflower wine. 5 gallons.

As for recipe 3 but with 3.4 kg sugar added to raise the original gravity a little, to 1071.

BUT!!!! Something happened which resulted in an unintentional experiment. I forgot to take the elderflowers out of the secondary fermentation barrel when i went on holiday. It was some 5 weeks later that i removed them. and then another 2 weeks passed before i racked the wine. I feared that i had spoiled it with my forgetfulness. But I'm pleased to say that all worked out fine. This last batch has been ready to drink for 2 weeks and it's just fine. It was started on 30th June.

Thursday, 19 June 2014

Recipe: Blackberry Wine 2014

I had a busy autumn and winter so the blackberries picked last year stayed in the freezer for an age. Mrs Critterwines had her patience tested while i dilly-dallied. But finally in mid March 2014 i got busy. I know one friend (hey Craig!) still has blackberries in the freezer and is going to make this wine, so i'll give a pretty much full account of the recipe and method i used. Also why i did stuff as i did. If you're new to making a fruit wine on the pulp then you'll appreciate this. If you're not new to fruit pulp wine making then bear with me, after all you probably only need the recipe, and that's coming first.

Blackberries foraged in autumn 2013, with some ale sampling as a reward. Mrs critterwines almost features, but doesn't want to be a celebrity  ;-)

Recipe: 4 gallons.

7.550 Kg Blackberries (frozen)
4 Kg Sugar
5 Teaspoons Pectolase
3 Campden Tablets
1.5 Teaspoons Tartaric Acid
3 Teaspoons Citric Acid
Yeast Nutrient (Tronozymol)
Yeast (GV1)
Water to make liquid volume to 4 gallons

OG 1091 (i'm expecting a wine around 13% ABV)

Frozen blackberries, bagged

Note on Ingredients:

Blackberries - wash them to remove bugs, leaves, rotten fruit etc...  drain them a while, bag them and tie up the bags. stick in your freezer. if the bags are likely to get encrusted in ice then weigh them first cos doing so afterwards will be a technical complexity that you won't want to be bothered with when you're ready to brew. You need to take notes like this because when you make a stunning wine you'll want to repeat it.

Sugar - no need for any fancy brewing sugar. plain white sugar does the job. I use silver spoon cos it's local. if i didn't use that i'd use something fair-trade. Some folk say that beet sugar (silverspoon) isn't as good as cane sugar, that it has a very slight earthy taste. Personally i can't tell the difference and i've been brewing for over 20 years, and have tried both extensively. if you're a reductionist materialist (i'm not) then you'll probably argue that they are chemically identical, so there would be no difference. if you're not then you'll have plenty of reasons for insisting it could make a difference. Tho that doesn't mean we can pick it up reliably. The debate will run on and on for some time.

Campden Tablets - These help with 2 things. First of all they'll stun any wild yeasts on the berries. This means your chosen yeast will be able to breed (bud) and establish a healthy colony before the wild yeasts come to. You want your yeast to do the fermenting, not take your chances with a wild yeast. More on this later in the yeast section. The second thing it does is a little chemistry. I don't remember the details off the top of my head, and they're not important. The effect is that it helps with something called esterification. ester are powerfully fruit smelling/tasting molecules. The molecules that gives pear drops or pineapple chunks their flavours are esters. Campden tablets release sulphites, probably the most common food preservative out there. Some people are sensitive to it, most are not. Using campden tablets at this stage of a fermentation (i.e. at the start) probably results in nothing detectable remaining when the wine is ready to bottle. This is about the only stage i use campden tablets at these days. But if you;re new to brewing then i recommend you use it when you bottle too. Most novice brewers bottle too soon at some stage and get exploding bottles or bottles popping their corks. Using campden tablets will reduce the risk of this happening, greatly.

Pectolase - This is an enzyme, a biological catalyst. It breaks down pectin which can cause you problems with getting your wine to clear properly. Lots of fruit has pectin in it and if clear wine maters to you then use it. You can leave this out if you're funny about adding chemicals, but you'll often end up with hazy wine. Personally i am funny about chemicals, but i still use pectolase.

Tartaric & Citric Acids - Acidity is one of the qualities of wine that makes it wine. Grapes are very acidic, most other fruits are not as acidic, so we need to add more to get that wine like feel and quality. Brewers have a limited choice of acids to add to their non-grape wines. Citric (lemons), Malic (Apples) and Tartaric (grapes). Citric tastes like lemons, malic is harsh tasting and doesn't taste like apple, tartaric is pretty much clean tasting. This means tartaric acid won't interfere with the flavour of your wine, which can be important. But sometimes the lemon flavour of citric acid enhances the other flavours.

Personally i like lemon with blackberry, so i use more citric than any other acid. If you're into natural acids then the juice of one lemon is roughly equivalent to 1 teaspoon of citric acid.

Yeast Nutrient - yeast is a complex little critter and we don't know much about it at all. However we know that it needs more than sugar to be happy and healthy. One of the things it needs is nutrients. Grapes have plenty of yeast's favourite nutrients, but other fruits don't. So we have to give them a boost. Yeast nutrient contains some minerals but also vitamins. More expensive nutrients will smell a bit like marmite cos they have lots of B vitamins in them. The one i use is getting into the more expensive options. And don't worry, that strong B vitamin smell won't be in your wine. The yeast will gobble up all those vitamins.

Yeast - One of the most important choices you'll make when it comes to making wine. I chose to use GV1 (Gervin number 1) because i've used it before and i'm always happy with the results. The reason i chose it first time around was because it's low foaming (won't make a foamy head which invariably oozes out of fermenting bins and/or clogs up airlocks and is generally a pain to deal with). It's also a quick starter, which means that you'll soon see signs of fermentation. and thats good because the faster it gets going the less chance there is of your wine getting infected with a wild yeast. And it also ferments down to lower temperatures than many other yeasts. Great if you're fermenting in a cool room in the winter! Yeast strains usually come with a simple description of what they are good for. i.e red wines, white wines, low foaming, temperature range, acid metabolising or not, alcohol tolerance and so on. Picking one is quite easy. Just read the packet, you'll look like you know what you're doing even if you don't, and the descriptions really are very simple to follow.

A word on wild yeasts. Many novice brewers, especially those who are suspicious of food additives and so on, want to brew with a wild yeast, the yeast naturally present on the fruit. It sounds great and i'm sure there are plenty of commercial wine-makers doing this. However, those wine makers are in the business of ensuring that they get the desired yeast on their grapes. I don't know how they do it but i wouldn't be surprised if there were chemicals involved. Most importantly they know that any old random wild yeast is not the way to make good tasting wine. Candida is a natural yeast after all.

The reason it matters is that yeast doesn't only make alcohol and carbon dioxide. it's a little living critter of some sort (no-one knows precisely what it is!) and makes other waste products. some of which taste good, some don't. different strains make different products. Added to that is the fact that at different temperatures the same yeast will make different products. And different yeast strains have different alcohol tolerances. Ones that tolerate alcohol levels up to around 13% are not particularly common in nature. That's wine territory, so if your yeast will not tolerate alcohol above 5% then you won't get wine strength, you get beer strength. and chances are you added enough sugar to make wine. so you'll end up with a sweet fruit juice with some token alcohol content.

So combining the lack of control (through not knowing your yeast strain) over by-products, temperature requirements and alcohol tolerance means you're definitely shooting blind. If you don't mind this then go for it. Know tho that the chances of repeating a fortunate success are very slim. Natural yeast populations will vary year on year. I should add that if you go the wild yeast route you will almost certainly still like your wine. That's one of the joys of wine-making, even a failure is passable quality for the home-brewer, especially the novice or dabbler. But when you brew plenty, over many years, then you will wonder what you ever saw in those early brews when you didn't take advice. On the other hand if you want to make a wine that is fully natural and removed from artificial chemical or biochemical ingredients and processes then you have to go for it. You'll probably end up fermenting with honey, which i haven't done. Good luck with that journey, it's a whole other specialist world and if you want to try it then this blog won't help you.

Method:

Day 1 - Before bed remove your blackberries from the freezer and allow them to defrost overnight. pic below shows frozen berries in 5 gallon bucket, with my hand for scale.

Day 2 - unwrap the berries and tip them into a big container. mash them with a potato masher of your bare, washed, hands. do it til you're bored stiff. the more you do it the better. it may take 15 -30 minutes
for a few kgs. Don't be tempted to use a blender. you could split seeds and these have a strong bitter flavour which you won't want in your wine.

Once thoroughly mashed to pulp tip into your super clean fermenting bucket. Add crushed campden tablets, pectolase, sugar (dissolved in water). Stir well, cover and leave overnight. this is the stage when natural yeasts will be stunned by the sulphites (they be dozy from just coming out of the freezer anyway!). and the pectolase will start working on the pectin.

Day 3 - Add tartaric and citric acids, dissolved in water. Also yeast nutrient (quantity according to instructions on the packet). Then add water to what you think will make about 4 gallons of liquid. If your vessel has marking on it then i'd take it up to 4.5 gallons cos the berries take up room and will be removed eventually. Stir it very well, and even use a whisk to make sure that you get plenty of air dissolved in the liquid, like beating eggs. Yeast needs oxygen to reproduce (bud). And the sloshy stirring will also drive off sulphites, giving your yeast the best chance to make a flying start. Measure the gravity with a hydrometer and record it. Then add the yeast, cover and leave overnight.

From here on you may want to stir the must, sloshily, one a day for the next 3 or 4 days. Especially if the fermentation hasn't started. But aside from that keep it covered.

Day 8-10 - Decant or siphon your wine into a secondary fermentation vessel, fitted with an airlock. Leave as much pulp behind as you can. Do it gently cos there will be a lot of sediment in the primary fermentation vessel. thats the one that you started your wine in. You want to leave most of that sediment behind because there's lots of dead yeast in it. Make sure the airlock is fitted properly. Forget about your brew. It may ferment for a week longer, or maybe a few weeks.

Finishing off

When it's finished fermenting rack the wine into demijohns, with airlocks. Leave as much sediment in the secondary vessel as you possibly can. Your wine is now in the conditioning stage, and it does need that time. The flavour will be much better if you leave it for some months. You really don't have to do anything else, but you may want to do some other things.

1. You may want to degas the wine. This will help the wine to clear. dissolved carbon dioxide adds to the density of water, and this will make it a little harder for particles to drop and form a sediment. Suspended particles are what stops your wine from clearing of course. If you don't degas then your wine may have a slight fizz to it, called a frizz. Personally i like it in rose and white wine, but don't with reds. so i degas reds, and this is a red.

2. You may want to stabilise your wine chemically. i.e. add campden tablets (1 per gallon) and potassium sorbate (1 teaspoon per gallon). The former will stun any still living yeasts. The latter will stop yeast from budding. Both are common food additives but some folk don't like consuming them. These additions pretty much guarantee that there will be no further fermentation. Which is reassuring when it comes to bottling. These days i rarely use them.

3. If your wine doesn't clear after a few months then you have some options. First for me is degassing. If that doesn't work then i stabilise. If that doesn't work then i wait til winter and put the demi-johns outside on a cold night. sometimes the cold will make suspended particles drop to form a sediment. If it still doesn't work then i usually just put it away and forget about it for a couple of years. but you could try using finings. I've had success with chitin based finings (source: shellfish). You can also get gelatin based finings (source: pigs skin usually i think). Or you could try Irish moss (seaweed). Personally i wouldn't bother with trying anything else. Bentonite (clay) is good when used at the start of a fermentation, but at the end it can strip lots of flavour and colour too. You can also try filtering, but it's a bit fiddly unless you have an uber kitchen with lots of space.

Bottling

Once your wine is at least 6 months old, but preferably a year, then you can bottle it. Tho don;t bottle it unless you want to drink it or need the demi-johns for making more wine. Before you bottle it measure the gravity. it should be low. like 990 - 998. if it's higher than this then you have residual sugar and there's a chance your fermentation will start again in the bottle. if you stabilised this won;t happen. but if you didn't then its not worth risking bottling. exploding bottles are no joke. if you must bottle use corks, at least there's a chance to release the pressure if it does start fermenting. don't use screw caps, they won't blow. If you must use screw caps then use plastic bottles cos they won't explode, they'll expand massively before they pop. but storing wine in plastic for a long time is not a good idea.

And that's all folks, it was a long one. But it's good to go deep from time to time.

EDIT: Drinking it, 6 months later.

So time has passed and the wine is ready, properly ready. deliciously blackberry, will mellow around the edges a little with time. i.e. it's a bit sharp, but it's just balance cos it's not an all round big wine, so it won't do your stomach in! That's just my opinion tho, Mrs Critter Wines doesn't agree, and neither do other folk who've tried it.

Many brewers pretty much dismiss a straight blackberry wine, saying that elderberries improve it. Well it depends on your tastes to be honest. If you only like a big bodied red wine then go with elderberries. But if you also enjoy something a little subtler then give this a try sometime. I enjoy both, depends on my mood, food etc. And sometimes i just want a drink so anything will do!

Wednesday, 18 June 2014

Brief Update on December's Wines.

I've got a few "new" recipes to add, and i'll get around to that soon, but first a brief update on the wines i made in december 2013. Most of them were quickies, so me and mrs critterwines have been enjoying them for some months.

Cranberry & Blueberry: bit of an old faithful of a wine, and again turned out predictably delicious and easy drinking. No wonder i keep making it, and no wonder mrs CW keeps asking for it.

Passion Fruit: I hadn't tried this before, but wish i had. Its definitely our favourite quickie of the brews i'll be mentioning in this entry. Of all my brews only elderflower is more delicious. This is a quickie wine you must try. Stick to the recipe and method, don't be tempted to make it stronger by using more sugar. make sure that half your juice is grape juice (red or white, your choice).

Cherry: Hadn't tried this one before either. It's as good quality as the blueberry & cranberry tho doesn't have the crisp edge that probably comes from the cranberries. Still, i'll make it again i'm sure.

Sorrel: Another one i hadn't tried before and will repeat. It's very good. The wine is a little more grown up then either the cherry or the cranberry & blueberry. a little extra astringency is what i think does it. But it's pretty similar to both of them otherwise. I'm tempted to play with this a little more, make it a tonic kind of wine cos sorrel has health benefits. so i'm thinking ginger would probably go well with it for example.

Lemon Balm: I used the quickie base for this wine and the results are fine but not what i expected. The flavour of the lemon balm didn't really come out. My guess is that picking it in winter was bound to have this result. Regardless i have a very pleasant white table wine. When i bottled the second gallon i stuck a sprig of lemon balm in each bottle. It helped to infuse some flavour after a few days, and the bottles look beautiful. However the flavour was still delicate. When i bottle the last gallon i'll try 2 or 3 sprigs per bottle. ... and look out for ladybird grubs on the leaves, found one in an empty bottle! There's worse ways to go i guess.

Really you can't go wrong picking any of these brews. so pick which one floats your boat going on intuition and/or what you like the sound of and/or your own tastes, favourites etc. If you're really stuck, spoiled for choice perhaps, then go for the passion fruit. Or go with your budget, what juices are available and in your price range.
 

Counters
Lamps Plus Lighting